Telephone/WhatsApp:+86 156 2656 0610

Telephone/WhatsApp:+86 156 2656 0610
Email:seekmach@gmail.com

A lawn mower blade does not need to look ruined before it starts hurting cut quality. A dull edge tears grass instead of slicing it, leaves pale or brown tips, makes the mower work harder, and can turn a normal weekly cut into a ragged finish. If you are maintaining a mower from the SeekMach lawn mower category, blade sharpening should sit beside oil, filters, deck cleaning, and storage as a routine ownership habit.
The goal is not a razor edge. A mower blade needs a clean, even cutting edge with the correct original bevel and enough metal left for strength. Over-sharpening can make the edge fragile. Grinding unevenly can unbalance the blade. Installing a blade upside down, using the wrong torque, or ignoring a cracked blade can create a dangerous machine. Slow, careful service beats aggressive grinding every time.
Before any blade work, shut the mower down, remove the key if equipped, disconnect the spark plug lead or battery according to the manual, let hot parts cool, and keep hands away from the cutting path. The U.S. Consumer Product Safety Commission lawn mower safety guidance is a good reminder that mower injuries often come from routine work done too casually.

Walk the lawn a day after mowing. If the grass tips look shredded, white, tan, or ragged, the blade may be tearing rather than cutting. Torn tissue loses moisture faster and can make a lawn look stressed even when mowing height and watering are reasonable. A dull blade also forces the mower to work harder, especially in thick or damp grass.
Cut quality is not only about sharpness. Deck pitch, blade speed, mowing height, tire pressure, ground speed, wet grass, and clogged discharge areas all affect the result. Still, the blade edge is one of the simplest places to start because you can see and service it. For broader mower fit decisions, the SeekMach product overview helps compare mower use with other property-maintenance machines.
There is no single hour count that fits every property. Sandy soil, hidden sticks, pine cones, gravel edges, and dusty conditions dull a blade faster. A clean lawn mowed at a steady schedule may need less frequent sharpening. Commercial operators may inspect blades daily; a homeowner may sharpen several times during a growing season. The practical rule is to inspect the edge when cut quality changes, after hitting debris, and before heavy seasonal growth.
Do not keep mowing after a hard strike. Stop, disconnect power, and inspect the blade, spindle, adapter, and deck. A bent or cracked blade should be replaced, not reshaped. A blade that wobbles can damage the mower and create vibration that the operator feels through the handle or seat.
If your property maintenance includes mowing around gravel lanes, orchard rows, drainage edges, and equipment yards, compare mowing work with the broader SeekMach application page. Blade wear is often tied to where the mower is used, not only how often it runs.
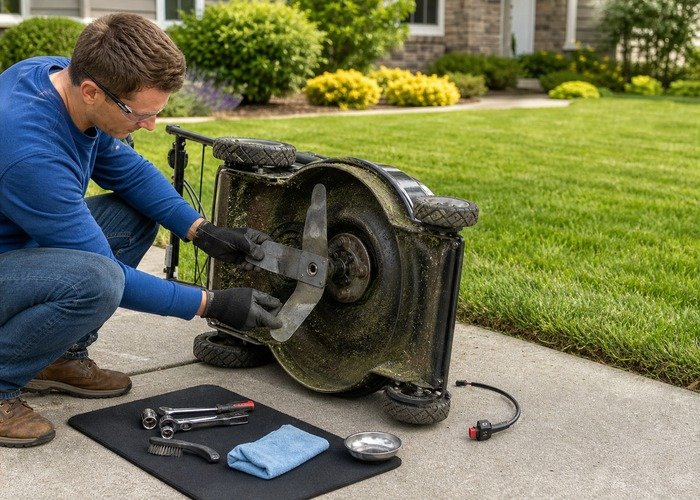
Remove the blade only according to the manual. Mark the bottom side before removal if orientation is not obvious. Wear gloves, support the blade, and use the correct wrench. Many people remember the bolt direction incorrectly, so check the manual instead of forcing it. Once the blade is off, clean packed grass from the center area and inspect the whole piece, not just the cutting tips.
Look for cracks, deep gouges, severe thinning, bent wings, enlarged mounting holes, and uneven wear. If the blade has lift wings, check them for damage. If too much metal is missing on one side, sharpening will not restore balance. Replacement is the safer choice. The University of Georgia Extension lawn care resources are useful for connecting mowing practices with turf health, because blade condition is only one part of a clean lawn.
IL Penn State Extension turfgrass resources make the same broader point from a lawn-care angle: mowing height, timing, turf stress, and equipment condition work together. A sharp blade is not a cure for mowing too low in hot weather, but it removes one avoidable source of plant stress.
Follow the original bevel angle instead of inventing a new one. Use a file, angle grinder, rotary tool, or bench grinder only if you can control heat and shape. Heavy grinding can overheat the edge and remove too much metal. Work from the top side of the cutting edge on many common blades, but verify the blade design and manual.
Move evenly. Count passes if using a file. If using a grinder, use light contact and dip the blade to keep it cool if needed. You are not polishing a knife. You are restoring a durable mower edge. A slightly blunt, clean edge often holds up better than a thin razor edge that folds over after the first contact with grit.
After sharpening, balance the blade. A blade that hangs lower on one side has more weight on that end. Remove a small amount of metal from the heavier side and check again. Use a cone balancer, nail method, or manufacturer-approved tool, but make sure the blade can sit level without being forced. Unbalanced blades can cause vibration, bearing wear, loose fasteners, poor cut quality, and operator discomfort.
Balancing matters even when the blade “looks close.” A small difference at the blade tip becomes meaningful at mowing speed. If you cannot balance the blade without removing too much material, replace it. For owners running larger equipment on mixed property, the SeekMach application solutions page is a useful reminder that machine setup, maintenance, and work conditions all affect the final result.

Clean the mounting surface before reinstalling the blade. Confirm the cutting edge faces the correct direction and the lift wing points correctly toward the deck. Installing a blade upside down is more common than people admit, and it creates terrible cutting performance. Use the correct washer or adapter arrangement and tighten the bolt to the manual’s torque value.
Reconnect the spark plug lead or battery only after the blade is secure and tools are removed. Start the mower in a clear area and listen. New vibration means stop and recheck. Do not assume vibration will “settle in.” A balanced blade, clean mounting surface, and correct installation should feel normal.
| Lawn symptom | Possible blade issue | Other checks to make |
|---|---|---|
| Brown ragged tips | Dull or nicked cutting edge | Wet grass, mowing too fast, low blade speed |
| One side cuts lower | Bent blade or deck issue | Tire pressure, deck level, spindle damage |
| Repeating uncut strip | Damaged blade or wrong blade | Deck clogging, overlap, blade orientation |
| Heavy vibration | Unbalanced or bent blade | Loose bolt, damaged adapter, spindle bearing |
| Clumps after mowing | Poor lift or dull edge | Wet grass, clogged deck, ground speed |
Use the table to avoid tunnel vision. A sharp blade will not fix a badly leveled deck. A clean deck will not fix a bent blade. A slower ground speed may improve cut quality in thick grass even when the blade is sharp.
Walk-behind mowers are usually the simplest to service, but they still require safe positioning and power disconnection. Riding mowers and zero-turn mowers may use multiple blades, which means all blades should be inspected as a set. If one blade is badly worn, the others may be close behind. Keep each blade matched to the correct spindle position if the design requires it.
For larger decks, remove and sharpen blades in a clean sequence. Photograph orientation before removal. Label blades if needed. Inspect spindle bearings, belts, pulleys, and deck buildup while access is open. If you are comparing mower formats for a larger property, review the SeekMach lawn mower page with blade access and service time in mind, not only deck width.
Picture a homeowner mowing a large yard after a fast spring growth week. The lawn looks pale two days later, so the first thought is water stress. A closer look shows shredded leaf tips across the whole cut, worse where the mower had passed over sandy soil near the driveway. The mower still started fine, the deck was mostly clean, and the height was reasonable. The blade edge, however, had small dents along both cutting ends.
After sharpening to the original bevel, balancing the blade, cleaning the deck, and slowing ground speed in the thickest areas, the next cut looks cleaner. No miracle claim is needed. The improvement comes from slicing instead of tearing, plus a better mowing rhythm. The lesson is simple: inspect the blade before changing everything else.
Yards are rarely uniform. A front lawn may be smooth and irrigated, while the back edge near a gravel drive may be dusty, thin, and full of small stones. A blade that stays clean on the front section can lose its edge quickly near driveways, construction soil, exposed roots, and dry sandy patches. If the mower is also used around sheds or machinery storage, inspect the blade more often because hidden debris will do more damage than normal grass.
Tall wet growth creates a different problem. The blade may still be sharp, but packed clippings under the deck reduce airflow and lift. The mower starts pushing grass over before cutting it cleanly. In that case, sharpening helps only after the deck is cleaned and ground speed is reduced. The University of Minnesota Extension lawn care guidance is useful for thinking about mowing as a turf-health habit rather than a single machine setting.
Commercial crews should treat blade condition as a route-planning issue. A property with sandy soil may need a mid-day blade change. A property with hidden roots may need slower passes and a higher mowing height. A homeowner with one mower can use the same logic by checking the blade after difficult sections instead of waiting until the whole lawn looks rough.
Keep a spare sharpened blade if mowing time is limited. That lets you swap quickly after a hard strike or before a busy weekend. Store blades dry, lightly oiled if appropriate, and away from children. Mark worn blades so they do not accidentally return to service. If the mower sits through winter, remove packed grass, inspect the blade, and start the next season with a known edge.
For a fleet or contractor, blade logs can be useful. Record date, machine, blade condition, sharpening method, and replacement notes. That pattern helps identify lawns with abrasive soil, operators mowing too low, or decks that repeatedly damage blades. The OSHA landscaping and horticultural services page offers broader safety context for crews working around outdoor power equipment.
If mowing is one part of a larger rural-property routine, keep the mower service plan near the tractor and excavator service notes. A tractor and an excavator cover very different jobs, but the useful habit is the same: inspect the part that touches the work before assuming the whole machine is the problem.
It should be clean and even, but not razor thin. A durable edge with the original bevel is better than a fragile knife-like edge that rolls over quickly.
Yes. Any sharpening removes metal. Balancing helps prevent vibration, bearing wear, and uneven cut quality.
It is possible on some machines, but removal usually allows better inspection, safer control, and proper balancing. Follow the mower manual.
Replace a blade that is cracked, bent, severely thinned, deeply gouged, impossible to balance, or worn beyond the manufacturer’s limit.
Check deck level, blade orientation, spindle condition, deck buildup, mowing height, tire pressure, wet grass, ground speed, and whether the blade is the correct part.
Watch a practical sharpening and balancing walkthrough here: lawn mower blade sharpening on YouTube. A clean lawn starts at the blade, but the real value is the habit: inspect, sharpen gently, balance carefully, reinstall correctly, and adjust mowing conditions before blaming the mower.