Telephone/WhatsApp:+86 156 2656 0610

Telephone/WhatsApp:+86 156 2656 0610
Email:seekmach@gmail.com

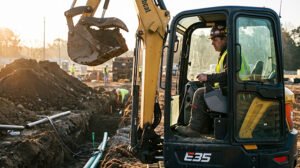
The first 60 minutes after a factory-direct excavator arrives on your site are crucial for both legal and mechanical reasons.
The delivery driver hands over paperwork, the container doors swing open, and most buyers focus entirely on getting the machine off the truck. That instinct is understandable — but it skips a step that can cost tens of thousands of dollars later. There’s a hard line between a cosmetic delivery acceptance and a proper technical commissioning, and conflating the two is one of the most common mistakes new equipment owners make.
The 60-Minute Rule: Document everything before you move anything. The window between container seal and first engine start is your only opportunity to capture the machine’s true as-received condition — the baseline your insurer and manufacturer will rely on if a dispute arises.
Sea transit introduces mechanical stresses that aren’t visible on the surface. Weeks of ocean shipping expose a machine to sustained low-frequency vibration, humidity cycling, and corrosive salt air — conditions that can fatigue fasteners, displace grease, and accelerate oxidation on exposed fittings. A machine that looks factory-fresh at the door may have developed hairline issues at weld points or loosened hydraulic connections in transit. As EquipmentWorld notes, “The most important part of a new machine inspection is the ‘walk-around,’ where you look for signs of shipping damage that could lead to long-term structural fatigue.”
The legal stakes are equally serious. Insurance claims and warranty disputes almost always hinge on documented proof of when damage occurred. Photographing every panel, fitting, and fluid level — working through a thorough new excavator inspection checklist before a single control is touched — establishes that baseline. Without it, a pre-existing crack becomes a liability you own. Understanding how structural protection systems can be compromised during transit reinforces why that documentation pass matters before any operational testing begins.
With that foundation in place, the first practical step is the unloading process — which carries its own distinct set of risks worth examining closely.

Every factory-direct excavator delivery inspection starts before the machine moves an inch — the container itself tells you critical information about what happened during the journey.
Before breaking any seals, walk the full exterior of the container and document any dents, bowing, or moisture damage that could signal internal shifting. As EquipmentWorld notes, factory-direct shipments undergo significant vibration during sea transit, making boom and arm joint integrity a primary concern — but you won’t know the extent until you’ve confirmed the machine arrived in a stable position.
Unloading Sequence
Setting up a safety perimeter is more important than most operators expect. Before the first engine start on the ground, establish a minimum 10-foot clear zone around the machine and confirm no bystanders are within the swing radius. This initial cold-start moment is when hydraulic line integrity and brake response get their first real-world test.
With the machine safely on the ground, the next priority shifts to what the transit stress may have done structurally — and that means a close look at ROPS and FOPS certifications, weld integrity, and safety compliance markings.
Structural verification is a critical checkpoint that separates a legally operable machine from an expensive liability — especially when receiving imported heavy equipment from China, where documentation standards vary widely between manufacturers.
ROPS and FOPS certification plates are your first legal checkpoint. According to OSHA, a comprehensive inspection must begin with verifying these certification plates to confirm international safety compliance. Locate the ROPS (Roll-Over Protective Structure) plate, typically welded or bolted near the operator cab frame, and cross-reference the serial number and rating against your procurement documents. The FOPS (Falling Object Protective Structure) plate follows the same logic — confirm the impact rating matches the job classifications listed in your purchase agreement. If either plate is missing, illegible, or inconsistent with your paperwork, the machine cannot legally enter service in most US jurisdictions until corrected.
CE and ISO markings demand the same scrutiny. These certification stamps should appear on the frame, cab, and major structural components. Pull out your procurement documentation and match each marking character-for-character. A mismatched ISO standard number or an absent CE declaration of conformity can create significant liability exposure and may complicate insurance claims after an incident. If you’re evaluating how machine size affects structural certification requirements, those differences become especially relevant during this verification step.
Boom welds and pin tolerances are the mechanical story of the transit. Sea transit subjects excavator booms to sustained vibration stress, which can initiate hairline cracks at weld seams that were perfectly sound at the factory. Run a flashlight along every weld joint on the boom and arm, paying close attention to the junction points where stress concentrates. Separately, check each pin and bushing by physically rocking the attachment points — any lateral play beyond factory-specified tolerances indicates wear or damage that requires attention before the first operational hour.
With structural compliance confirmed, the next critical layer of inspection moves inward — to the hydraulic systems that ultimately determine how long this machine performs.

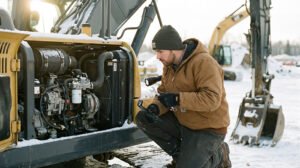
The hydraulic system is the single most important mechanical checkpoint in any factory-direct excavator delivery — and knowing how to inspect a new excavator after shipping means starting here, before you ever turn the key.
Hydraulic health is a key indicator of machine longevity. According to the International Journal of Engineering Research & Technology, hydraulic systems account for approximately 30% to 50% of total maintenance costs over an excavator’s lifespan. That number alone explains why a rushed visual check isn’t enough — a methodical fluid inspection protects your investment from day one. Modern compact machines, like those with advanced high-pressure hydraulic circuits, are especially sensitive to contamination introduced during transit.
Factory-filled fluid levels are a logical starting point. Manufacturers typically ship machines with hydraulic oil pre-charged, but long ocean or land transit introduces two risks: fluid loss through micro-seepage and aeration. Aerated fluid appears milky or foamy in the sight glass and feels spongy under actuator load. Check the reservoir sight glass on level ground, and if the fluid line sits below the minimum mark or shows discoloration, treat it as a red flag before any powered function test.
Control valves and the swivel joint are the two most leak-prone areas after shipping. Vibration during transport works fasteners and seals loose in ways that static storage never does. Run your hand along each pilot line connection at the main control valve block and inspect the center swivel joint — the rotating union between the upper and lower carriage — for any weeping. Even a slow seep here accelerates wear and can dump fluid once the machine operates under full hydraulic load.
Cooling system integrity deserves equal attention after extended storage. Coolant hoses stiffen and crack when a machine sits dormant in a shipping container through temperature swings. Squeeze each hose firmly; any brittleness or surface cracking signals a replacement before the engine is run hard. Check the coolant reservoir cap seal for integrity and confirm the overflow bottle hasn’t run dry.
| Component | Check Action | Red Flag |
|---|---|---|
| Hydraulic reservoir | Inspect sight glass on level ground | Fluid below minimum or milky/foamy appearance |
| Control valve block | Feel connections for weeping fluid | Oily residue or drips at pilot line fittings |
| Center swivel joint | Visual and tactile inspection | Any seepage around the rotating union |
| Radiator hoses | Squeeze for flexibility | Brittleness, cracking, or collapsed sections |
| Coolant overflow bottle | Check fluid level and cap seal | Low fluid or cracked reservoir cap |
Once the hydraulic and cooling systems clear inspection, the next logical step shifts to what the machine does with that hydraulic power — specifically, how efficiently it transfers it to the tools you plan to run. That makes attachment compatibility the natural next checkpoint.
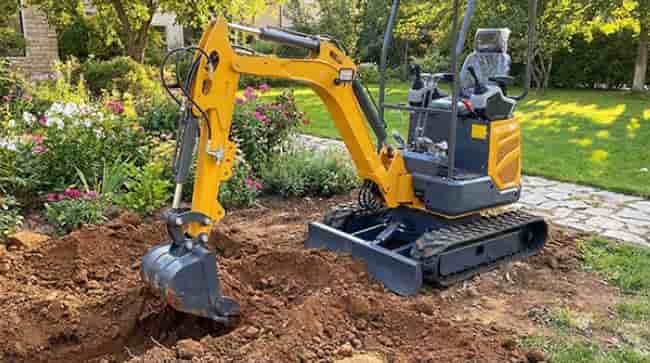
A factory-direct excavator is only as versatile as its attachment interface — and that interface deserves the same scrutiny as your hydraulic lines and structural welds.
The quick-hitch mechanism is the single point where versatility lives or dies. According to the Association of Equipment Manufacturers (AEM), verifying quick-change compatibility is essential for ensuring the machine can utilize a wide range of attachments without hydraulic mismatch. Before moving on to any step-by-step guide for excavator container unloading and operational testing, physically cycle the quick-hitch through a full lock and release sequence. The locking pin should engage cleanly, with zero lateral play once seated. Any hesitation or grinding suggests a factory misalignment that must be corrected before the machine enters service.
Pin diameter verification is equally non-negotiable. Factory-direct shipments sometimes arrive configured to regional specs that differ from North American standard attachment sizing. Measure the bucket pin and dipper pin diameters against the attachments you plan to run — a mismatch even a few millimeters off will cause premature bushing wear or, worse, an unsafe working connection.
Common attachments to test-fit immediately upon delivery include:
For operators planning aggressive multi-attachment workflows, attachment-ready sizing considerations are worth reviewing before finalizing your tooling inventory.
Auxiliary hydraulic flow requires a dedicated check. Connect a flow meter to the auxiliary circuit and confirm output matches the rated spec on your delivery documentation. Breakers and augers are particularly sensitive — an undersupplied circuit will underperform and void most tool warranties. Once the attachment audit is complete, the machine is finally ready for the first true test of its mechanical health: a full pre-start and first-run operational protocol.
The first engine start after a factory-direct delivery is the moment every prior inspection either confirms its thoroughness or reveals what was missed.
Before turning the key, the battery is your first checkpoint. Voltage should read between 12.4V and 12.7V on a rested machine. More importantly, check terminal tightness — shipping vibration routinely loosens connections enough to cause erratic electrical behavior without triggering any obvious fault. Wiggle each cable by hand and torque any loose clamps before proceeding.
Once the machine starts, the next 10 minutes are diagnostic gold. Watch the exhaust. Blue smoke signals oil burning in the combustion chamber; white smoke that persists past the warm-up phase points to a coolant or fuel delivery problem; black smoke indicates a fueling or air intake issue. Alongside the visual check, listen for rhythmic knocking, irregular idle, or any sound that changes under throttle load. Abnormal hydraulic pressure behavior often announces itself acoustically at this stage before a gauge reading confirms it.
“The first 10 minutes of engine operation after delivery are the highest-density diagnostic window you will have. Changes in sound, smoke color, or idle stability that stabilize quickly are often minor. Those that persist or worsen require immediate investigation before the machine enters any work cycle.” — Industry field service consensus, excavator pre-operation protocol
Track tension and final drive performance come next. Engage the tracks individually on flat ground, listening for grinding or chattering from the final drive motors. Uneven tension — sagging or overtight — directly affects undercarriage wear rates and should be corrected before the first productive hour. Per guidance from the Association of Equipment Manufacturers (AEM), a pre-operation inspection should also include a test-fit of all ordered attachments to confirm factory-direct pins meet standard specifications.
Finally, cycle through every cab control: boom, arm, bucket, slew, and auxiliary circuits. Verify each safety cut-off — seat belt interlock, door switch, and emergency stop — functions independently. With the physical machine confirmed operational, the next critical step shifts to the paperwork: matching serial numbers and activating your warranty before a single productive hour runs on the clock.
The administrative close-out of a factory-direct delivery is just as critical as the physical inspection — skipping it can void your warranty before the machine turns a wheel.
Once you’ve completed the operational checks covered in the previous section, attention shifts to the paper trail. Matching serial numbers is the non-negotiable first step. Cross-reference the serial numbers stamped on the chassis plate, engine block, and hydraulic pump against every line on your purchase invoice. A mismatch — even a single transposed digit — signals a potential fulfillment error that must be resolved with the manufacturer before you sign any delivery acceptance form.
With serial numbers confirmed, document the machine’s physical state immediately:
The ‘Arrival Report’ is your warranty trigger. Most manufacturers require this document — typically a signed delivery confirmation with your timestamped photos attached — to officially start the warranty clock. Submit it within 24 hours of delivery; delays can create gray areas if an early defect surfaces.
Finally, organize your ISO and CE certificates into a dedicated job-site folder. Local municipal inspectors in many jurisdictions require these on demand, particularly for forestry or high-risk applications where FOPS certification is mandatory. A clean, accessible document package isn’t bureaucratic overhead — it’s operational insurance that pays off the moment any compliance question arises.
With your documentation locked down, the final step is consolidating every finding into one concise checklist you can reuse on every future delivery.
A disciplined 60-minute inspection at delivery is the single most effective way to protect your investment, activate your warranty, and establish a reliable maintenance baseline from day one.
The five checks below aren’t optional extras — they’re the non-negotiable foundation of factory-direct ownership.
In practice, these five checkpoints take under an hour but create months of downstream clarity. If any step raises questions — from attachment compatibility to local emissions compliance — the next section addresses the most common real-world scenarios buyers encounter after delivery.
Buying a factory-direct excavator raises practical questions that even experienced operators encounter — here are the most common ones answered clearly.
Q: What should I do if I find minor cosmetic scratches from shipping?
Document every scratch with timestamped photos before accepting the delivery, then note each item on the Bill of Lading. Minor cosmetic damage is often covered under a freight carrier’s liability claim rather than the manufacturer warranty, so separating the two protects both claims simultaneously.
Q: How do I verify the engine meets local emission standards?
Request the engine’s EPA or Tier 4 certification documentation from the manufacturer before delivery and cross-reference the engine serial number against that paperwork on arrival. A mismatch between the documented engine spec and the installed unit is a hard stop — do not operate the machine until it is resolved. Reputable suppliers operating under standardized ISO 9001 quality systems will have this paperwork ready at point of sale.
Q: Can I use standard local attachments with a factory-direct quick-hitch?
Coupler compatibility depends on whether the machine uses a globally standardized pin-on configuration or a proprietary quick-hitch pattern. Measure the pin diameter and spread at delivery and confirm they match your existing attachment fleet before the delivery driver leaves — retrofitting a mismatched coupler plate later adds cost and downtime.
Q: What is the first maintenance task after the initial inspection?
Change the engine oil and hydraulic filter within the first 50 operating hours regardless of what the hour meter reads at delivery. Break-in wear particles accumulate quickly, and routine hydraulic maintenance at this early stage sets a clean baseline for every service interval that follows.