Telephone/WhatsApp:+86 156 2656 0610
Telephone/WhatsApp:+86 156 2656 0610
Email:seekmach@gmail.com


Mini excavator safety isn’t just about following a checklist — it’s about confronting a dangerous assumption that compact equipment is somehow forgiving of mistakes.
There’s a psychological trap embedded in the word “mini.” Operators who have spent time around full-size excavators often approach compact units with a loosened sense of vigilance. The quieter engine note, the smaller swing radius, the machine’s ability to squeeze into tight residential yards — all of it whispers that the stakes are lower. They aren’t. A mini excavator still swings several thousand pounds of steel through an arc that can kill a bystander in under a second, and its reduced noise profile means nearby workers are less likely to register it as a hazard. That’s not a safety advantage — it’s a liability. As the Association of Equipment Manufacturers notes, “complacency is the biggest threat to safety on a compact job site; operators often underestimate the power of a mini excavator compared to its larger counterparts.”
Operating a machine and managing its risks are two entirely different disciplines. Operating means moving the controls with competence. Managing risk means maintaining active awareness of ground conditions, exclusion zones, underground utilities, and every person within the machine’s reach — before, during, and after every cycle. Most incidents don’t happen because an operator forgot how to use a joystick. They happen because familiarity replaced vigilance.
The foundation of genuine risk management also starts before the ignition key turns. Equipment that leaves the factory with verified safety systems — intact interlocks, calibrated hydraulics, properly torqued structural components — gives operators one less variable to fight. This is why sourcing machines with documented factory-direct reliability matters: it removes uncertainty at the base layer, so operators can direct their full attention to the job site environment rather than second-guessing the machine beneath them.
That environment deserves a disciplined, methodical review before a single track moves — and that’s exactly where pre-operational protocols begin.

A rigorous pre-start routine is the single most effective habit separating a disciplined operator from one waiting for an incident to happen. Complacency, as the previous section established, doesn’t always announce itself — it sneaks in during the rushed mornings and repeat jobs where everything seems fine. Structured heavy equipment operator training programs exist precisely because “seeming fine” and “being safe” are two very different things.
Before the key turns, the machine must earn the right to operate. Here’s what a professional walk-around actually looks like:
OSHA identifies slips, trips, and falls during machine entry and exit as a common non-fatal injury category — and the remedy is simple: maintain Three-Point Contact at all times when climbing in or out of the cab.
Terrain, however, introduces a different category of risk entirely — one that no pre-start checklist alone can address.
Terrain management is the overlooked discipline that separates confident operators from those who experience the statistics — and according to NIOSH, struck-by accidents and equipment rollovers account for the vast majority of fatalities involving compact excavators.
The ground beneath a mini excavator is not a passive factor — it’s an active variable that demands constant reassessment.
Blade positioning is the first line of defense. When executing deep digs, lowering the dozer blade to the ground behind the machine creates a critical third point of contact. This distributes the load across a wider footprint and prevents the rear of the machine from lifting as bucket forces increase. Many operators overlook this step during trenching and excavation safety operations, treating the blade as a grading tool rather than a stabilizer — a mistake that compounds risk at depth.
Slope orientation demands equally deliberate thinking. The standard rule is to keep the heaviest component — the counterweight end — pointed uphill. Driving or slewing a loaded bucket downhill shifts the center of gravity toward the lower tracks, dramatically shortening the tipping point. Even a modest 15-degree grade can turn a routine swing into an uncontrolled rollover if this principle is ignored.
Track width and extension directly influence how much lateral force the machine can absorb. Where terrain or jobsite conditions allow, extending the tracks to their widest setting lowers the tipping point and adds meaningful resistance to lateral movement. This is especially relevant on soft edges where the ground itself may shift under load.
Pro-Tip — Blade First, Always: Before any dig deeper than bucket depth, set and plant your blade. Think of it as deploying your anchor — it’s not optional on anything but flat, compacted ground.
Swing-out rollovers are a particular hazard when working near embankments or soft trench edges. The rotational force generated during a fast cab swing near an unstable edge can shift weight faster than an operator can compensate. Slowing swing speed, parking parallel to edges rather than perpendicular, and confirming ground bearing capacity before setup are all non-negotiable habits — habits that become even more critical once excavation breaks the soil plane. That transition point, from surface work to below-grade digging, introduces a distinct set of hazards worth examining closely.
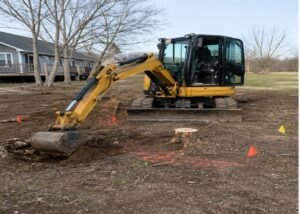
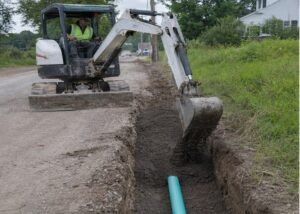
Trenching work transforms a mini excavator from a productive tool into a genuine life-safety instrument — and every item on your construction site safety checklist becomes non-negotiable the moment the bucket breaks ground.
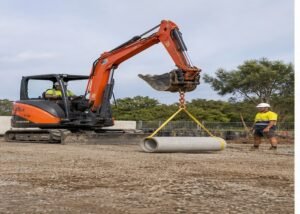
Underground utility strikes represent one of one of the most preventable — and potentially catastrophic — incidents in excavation work. The Common Ground Alliance is clear on the mitigation: once utility lines are marked, operators must establish a mandatory hand-digging zone within 18 to 24 inches of those markings on either side. The machine stops. Hand tools take over. No exceptions.
The hand-digging zone discipline exists because locating marks are estimates, not surgical precision. Soil shifts, previous contractors move lines, and survey markers fade. Within that 18-24 inch buffer, mechanical digging introduces margin-of-error risk that no experienced operator should accept.
Soil type is the next layer of complexity. Sandy or loose soils can collapse without warning, while clay holds shape longer but fails suddenly under load. OSHA classifies soils into Types A, B, and C — and the classification directly determines whether shoring, benching, or sloping is required before anyone works in or near an open trench. Operators who skip this assessment aren’t saving time; they’re borrowing it.
Communication between the operator and ground spotter should follow a pre-agreed system of hand signals or radio calls before the first pass. The spotter confirms utility clearance, monitors trench wall stability, and maintains visual contact throughout.
Warning: If a gas line is struck, immediately shut down the machine, evacuate all personnel upwind at least 300 feet, call 911, and do not use any electrical equipment nearby. If an electric line is hit, stay in the cab — stepping out can complete a ground circuit. Call the utility company and emergency services and wait for clearance.
That zone of danger around the trench itself extends well beyond the dig, which leads directly to the question of how ground personnel move safely within your work area — the focus of the next section.
Struck-by incidents are the leading cause of excavator-related fatalities on active job sites — and most happen within feet of a machine that never should have had anyone nearby.
Understanding and enforcing the swing radius is the most critical of all mini excavator safety tips. The swing radius is the full arc the machine’s upper structure can sweep during rotation — and it must function as an absolute exclusion zone, not a guideline. When the cab rotates at operating speed, the tail end swings outward with enough force to knock a worker off their feet or worse. No personnel should ever enter this zone while the machine is running, period.
Ground crew protocols depend heavily on a simple rule: eye contact before entry. Before any ground worker steps into or near the work area, the operator must acknowledge them — visually confirmed, not assumed. A quick wave or tool gesture doesn’t count. If the operator hasn’t looked at you directly, you don’t move. This single discipline has prevented countless incidents on well-managed sites.
One of the most underestimated hazards is the blind spot on the right side of the cab. Most mini excavators are designed with the operator facing left toward the boom, which leaves a significant visual gap to the right rear. Ground personnel who drift into this zone — even briefly — can become invisible to an otherwise attentive operator. According to OSHA, using the joystick or steering wheel as a handhold is a major safety violation that can trigger accidental machine activation, compounding the danger if a worker enters that blind corridor unannounced.
Physical barriers are a non-negotiable backup layer. Cones, high-visibility tape, or temporary fencing should mark the outer boundary of the swing radius before work begins. Barriers won’t stop a determined person, but they create a visual cue that breaks the autopilot behavior that complacency thrives on.
Ground rules every site should enforce:
The machine itself can’t protect people who assume the operator sees them. Protocols, barriers, and deliberate communication are what close that gap — and what the best operators internalize as habit rather than rule. That’s where training becomes the real differentiator.
Formal operator training is one of the most undervalued investments a contractor can make — and skipping it creates liability that no site safety handbook can fully offset.
“Learning on the job” isn’t a training strategy — it’s a risk transfer. When an untrained operator climbs into a mini excavator cab, they carry gaps in knowledge that don’t become visible until something goes wrong. That might mean misreading load limits, misjudging swing radius, or — crucially — not knowing how to respond when the machine behaves unexpectedly. Contractors who rely on informal on-site mentoring expose themselves to OSHA violations, insurance complications, and project delays that far outweigh the cost of structured instruction.
Certified training environments add a layer of accountability that informal mentoring simply cannot replicate. Courses aligned with CE and ISO equipment standards teach operators to understand machine-specific tolerances, not just general controls. This matters because hydraulic response, undercarriage behavior, and cab visibility all vary between models. A certified course contextualizes those differences. The AEM Safety Manual is explicit about foundational habits — including maintaining three points of contact when entering or exiting the cab — that experienced operators sometimes skip out of routine, a pattern complacency research consistently flags as a leading contributor to incidents.
Emergency scenario simulation separates good training from great training. Practicing a hydraulic pressure loss or unexpected engine stall in a controlled setting builds muscle memory that activates under real stress. In practice, operators who have rehearsed emergency shutdowns respond faster and with less hesitation than those who have only read about the procedure.
The ROI compounds over time. Trained operators produce fewer undercarriage wear issues, file fewer maintenance requests, and log safer hours — outcomes that mirror the discipline applied to other equipment investments. What changes when you swap the bucket for a different attachment, though, introduces a new set of variables entirely.

Switching attachments without a disciplined verification routine is one of the fastest ways complacency turns a productive shift into a serious incident.
Quick-couplers are only as safe as the last person who checked them. A locking pin that isn’t fully seated can release an attachment without warning — and the consequences of a hydraulic hammer or shear dropping mid-swing are catastrophic. Before every attachment swap, visually confirm the pin is engaged, cycle the coupler once under light load, and physically tug the attachment before bringing it into a work cycle. Rushing this step is exactly the kind of normalized shortcut that workplace safety research consistently links to incident escalation.
Different attachments fundamentally change the machine’s center of gravity. A standard bucket keeps the load profile predictable, but a hydraulic breaker adds concentrated mass forward, while a shear or grapple introduces dynamic lateral forces. Operators who switch between attachments without recalibrating their spatial awareness are essentially driving a different machine without acknowledging it.
Hydraulic hammers and shears require pressure settings matched to the attachment’s rated specifications. Running a hammer above its rated relief pressure doesn’t increase productivity — it accelerates wear, risks seal failure, and can cause unpredictable recoil. Always verify that the auxiliary circuit pressure is dialed to the manufacturer’s spec before starting percussion work.
Over-reaching with a heavy load is where physics wins and operators lose. Extending the boom to full reach while the bucket carries maximum capacity shifts the load moment dramatically, increasing tip risk — especially on uneven ground. As a practical rule, the heavier the load, the closer it should stay to the machine’s centerline.
These variables compound quickly, and keeping them organized comes down to consistent habit-building — which ties directly into the practical checklist framework worth reviewing before your next shift.
Safe mini excavator operation comes down to a handful of non-negotiable habits that, when practiced consistently, eliminate the majority of serious incidents on the job site.
Throughout this article, the recurring theme has been that complacency — not equipment failure — is the real danger. The checklist below distills everything covered into five actionable commitments every operator should internalize before the key turns.
The safest operators aren’t the most experienced — they’re the most consistent. Checklists aren’t busywork; they’re the behavioral firewall between a productive shift and a preventable tragedy.
Still have questions about specific scenarios — what actually triggers most accidents, or what to do when the machine starts to tip? The next section addresses the most common excavator safety questions directly.
Complacency remains the single greatest threat in mini excavator operation — and these questions reflect the real concerns operators and owners raise most often.
What is the most comcommon cause of mini excavator accidents?
Operator complacency and failure to follow pre-operation inspection routines top the list. According to safety research on workplace complacency, familiarity with a machine breeds overconfidence, leading operators to skip steps they once treated as non-negotiable. Struck-by incidents, tip-overs, and utility strikes are the most frequent consequences.
Do I need a special license to operate a mini excavator on a private farm?
Licensing requirements vary by state, but most jurisdictions do not require a formal excavator license for operation on private agricultural land. However, that legal exemption does not eliminate the obligation to operate safely — particularly when working near buried utilities or on uneven terrain. If you’re also running other farm equipment, understanding diesel equipment health basics can help you catch mechanical issues before they become hazards.
How often should safety inspections be documented?
Daily documented inspections are the industry standard. Most municipal site safety handbooks — including many site safety handbooks — require written documentation of daily checks to maintain compliance. In practice, a dated log of pre-shift walkarounds creates an accountability trail that protects both operators and site owners.
What should I do if the machine begins to tip?
Stay in the cab, brace yourself, and do not attempt to jump clear. Proper excavator training consistently reinforces this point: the ROPS structure is engineered to protect an operator who remains seated and belted. Jumping dramatically increases the risk of being struck by the machine as it rolls.
Approach every shift with the same caution as your first — because that mindset is what keeps experienced operators safe for the long haul.